
Unit 334 - Creating a Digital Image Portfolio
Exposure


OVER EXPOSED
EXPOSED
UNDER EXPOSED
Exposure is the amount of light let into the camera when taking a photo. The exposure triangle effects the exposure of the picture as it counts as the aperture. It is ISO, Shutter Speed and Aperture. If the aperture is low (f.5) the amount of light let into the camera is huge compared to a higher "F stop", so the ISO would have to be very low (around 100) and the shutter speed would have to be very quick so the aperture isn't exposed to light as long.
The way to see if you are going to take an over or under exposed photo is by looking at the exposure metre at the bottom of the setting screen on the camera. It will be -3___1___+3 and you will need it to be on the 1 if you want a nice exposed picture.
ISO Noise in the Image

The ISO determines how grainy an image is, for example looking at the middle left image, you can see that the image is dark and there's a lot of pixels making a grainy/noisy image. If the image is noisy, the ISO will be high, around 5000-8000, If the image is clear, sharp and lit up well, the ISO will be low as there won't be a need for it. ISO is mainly used to lighten up an image if you're trying to take pictures at night, where there's only street lights or no light at all.
Depth of Field

SHALLOW DoF:
This is a shallow Depth of Field as the background of the image is blurred and the tree is in focus. The settings I used to achieve this were a low aperture (f/4.6), the ISO was low at around 100-500 and the shutter speed was around 1/1000. You would usually use depth of field to have a main subject in your shot. For example, in this image the tree is clearly in focus and the background is blurred and out of focus.

LONG DoF:
This is a deep Depth of Field as the whole shot is in focus and clear through out. The camera settings I used to achieve this image were a bigger aperture (f/22), the same ISO at around 100-500 and a shutter speed of around 1/5000. You would usually use a deep DoF when filming a landscape shot and you want everything in focus.
Shutter Speed

Slow Shutter Speed:
Shutter speed is how fast the shutter on the lens of the camera will close and capture the image. In the image on the left, you can see that the car passing is very blurry and stretch out as it is motion blurred. This has happened because I chose a slow shutter speed of around 1/4 as well as a high f stop of around (f/22) and the ISO was at 100-400. You might use this technique when capturing car lights on a busy motor way at night, as it motion blurs the lights together making long neon lights.

Fast Shutter Speed:
This is a fast shutter speed as the car in the image is still and has no motion blur around it. This is because the shutter speed is fast and captured the car still, whilst moving past me. The shutter speed I used here was around 1/5000, the aperture stayed the same between the two pictures at (f/22) and the ISO also stayed at 100-400. You might use a fast shutter speed in filming wildlife or F1 racing when capturing fast moving subjects.
Rule of Thirds

This is the rule of thirds, which is basically the composition of your shot and how you have framed it. As you can see on the left, there are some lines going across the picture of an Ashton Gate Steward. These lines are used to help frame a shot and so that the subject is either on the left cross section or right cross section to draw your eye straight away. To help guide you to frame a good rule of thirds image, you can turn on a setting where it shows the guide lines on the cameras screen. This will be in the cameras menu settings.
1.1 Professional photography analysis
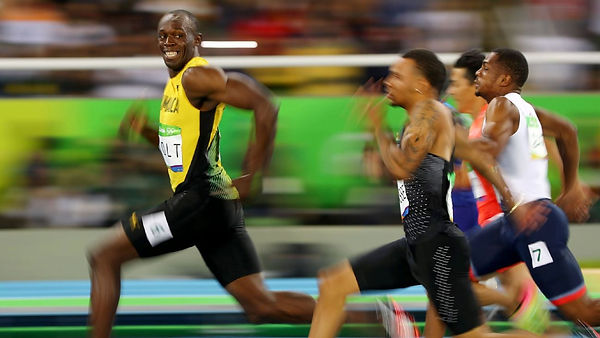
This famous sporting moment was captured by Cameron Spencer at shows the worlds fastest man, Usain Bolt, giving his competition a cheeky grin. The camera settings I think he used when taking this picture would be a shutter speed of around 1/1000 - 1/5000 as there is a bit of motion blur around the hands and legs of the athletes, however their torsos are clearly visible by the camera which I think was intended by the photographer. I think the ISO would have been on auto or the lowest (around 100) as there would've been enough light from the stadium.
As for the aperture used, I reckon it would've been at f/4.6 - f/8 as it is a shallow depth of field because the background is completely blurred. Another thing making this picture so great is the amount of colour in the frame. There is a lot of green/yellow with some black from the athletes clothes. These colours all together make this Usain Bolts' moment as they are his colours (Jamaicas colours).

This famous sporting moment was captured by Neil Leifer and shows Muhammed Ali standing over his opponent Sonny Liston after knocking him out. Looking at this image, I can tell that the Depth of Field is long, so its probably around (f/24), the shutter speed was probably around 1/1000 to 1/3000 as boxing is a fast sport and anything can happen at anytime. The ISO was around 100 to 500 as it was taken in a stadium which was probably well lit from above and around the ring. Since the photographer wasn't allowed in the ring, the shot has a low angle looking up at Muhammed Ali which shows how he towers his opponent whilst he's knocked out on the mat. Also, the blue hue that lingers in the background and the colour of the ropes blends with the crowd and the closer to the ring the clearer and less blue it gets. Finally, Muhammed's' facial expression and body language shows that he is triumphant and powerful as he pounds his chest with his right hand (his stronger hand that he used to knock out Sonny Liston).
20 Picture Challenge Gallery


This is the check list for the 20 picture photography challenge. As you can see, I needed to take 20 different pictures of areas around the stadium, I first walked over to Greville Smyth park where I capture a close up of some grass, an example of under/over/exposed and a picture of an animal. I then started to walk back towards the stadium where I captured a motion blurred car and a still car with shutter speed. To get a motion blur, you would use a slower shutter speed and visa versa. Following this, I shot a nice urban road sign and the clear sky. I then needed to capture a stranger, so I took a picture of one of the stewards who was on shift at the time. Nearing the end of the challenge, I only needed a self portrait, a class mate portrait, some food and a picture of the stadium inside and out, which are all in the gallery reel above.
RAG Rated Photos
1.2 Production

These are the photos I took during the primary stars event at the Robins High Performance Centre. I have RAG rated the photos into Red which is the least usable, Amber which is some what usable and Green which is the most usable.
All together, I took around 250 photos and 35 of them were RAG rated green and edited in Adobe LightRoom.
Editing Tools Used

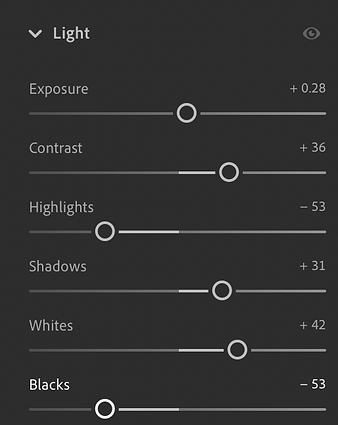
Exposure: When editing each of the photos, the exposure when taking them was already good and only needed a slight tweak.
Contrast: When adjusting the contrast on the images, I only ever increased it as it would make the images pop more by defining the whites and blacks in the image.
Highlights: Depending on what is in the background, like the white fence or stand, I would increase the highlights to make the more bright colours brighter or darker.
Shadows: Just like it sounds, the shadows when increased or decreased will make shadows darker or lighter.
Whites & Blacks: Slightly similar to contrast, the whites and blacks will increase or decrease the brightness of the whites and blacks in the image.
Vignette: For most of the edits, I decreased the vignette as it creates a slight black border around the image and defines the centre point.
Overall: For most, if not all of the edits used these adjustments as it defines the photos and makes them pop and a lot more vibrant than the originals


This is the original image I took whilst at the Robins High Performance Centre. I'll talk more in depth about what I changed when editing this image as for most pictures I took, I also cropped the image as there was a lot of negative space around the subject. For example, the whole right side with the cone has been deleted and the left side up to the ball as well.


Here is the edited image which you can see is cropped in from the original so the subject is staring you in the face (which is the 3 kids and the ball). When first editing this image, I adjusted the exposure but found that it was already good so I only slightly tweaked it. With the contrast, I increased it so the whites and blacks were defined more and it added sharpness to the image. For the highlights slider, this was decreased as there is a white fence in the back that it already bright and didn't need to be more, so I lowered this to bring more attention to the subject. With the shadows, I increased it as it also added to the overall sharpness of the edit.
Finally, with the whites and blacks, this was already changed with contrast but this allows me to adjust in more depth. I increased the whites as I decreased the highlights and the image was quite dark at this point and with blacks, I decreased this as I increased the shadows.
Also, the hue was changed to make the bibs more vibrant and the vignette was added to draw your eyes to the centre.


Here is an edited and un-edited photo from the day trip to the Robins High Performance Centre. When taking the original picture, the sun was behind a cloud and it was quite chilly so the exposure was good and didn't need adjusting by must when editing, just enough to make it sharper. Looking at the final edit, I can see that the adjustments I made were good at making the image pop, whilst also keeping it realistic.
Here are the sliders that I used in Light Room to make the edit. When editing, I like an image that has good contrast and colour so I increased the contrast and changed the other sliders to complement this. I also added a vignette to draw your eyes to the centre and I also increased the saturation to add more vibrance.


Here is another edit from the High Performance Centre which shows a kid striking the ball. I started by cropping into the middle by cutting off the right side and a bit from the top. Similar to the other edits, I slightly adjusted the exposure and increased the contrast by +36. I then changed the other sliders to make the image sharp and vibrant. I did this as the final outcome looks clear and professional. I also added a vignette to draw your eyes in on the kid and the ball which are the main two subjects in this edit.


This edit shows the goal keeper getting ready to save a ball coming from above. When editing this image, I started by cropping into the goal but keeping the ball in shot. I didn't need to adjust the exposure and for the rest of the sliders I increased the contrast whilst keeping the whites down as the goal and fence are quite bright originally. I also lowered the blacks as I've made the shadows higher to add suspense to the shot.
Raw Images


Edited Images


1.3 Project Evaluation
For unit CDM 334, I had to develop my photography skills by first doing a 20 shot photography challenge where I had to take pictures with a shallow DoF or a Long DoF and many other camera settings. I also had to take pictures of thing you'd find around the area like road signs or just the sky. A few problems I had with this challenge were at first, getting the camera in the right settings as I had to change them manually so when it came to capturing motion blur with a passing car, it took a while to get it right. In future, I will practise the manual camera settings more so that I don't struggle with them. For 1.2, this was the production part of this project, we went to the Robins High Performance Centre to photograph the primary stars event from 1-4pm. Overall, I took around 250 photos and 35 of which I edited in Adobe Lightroom. When editing these images, the exposure for all of them was fine and didn't need adjusting by much. However, I did adjust the contrast and the other settings like highlights and blacks and whites. For most of the edits, the adjustments were the same so they will look similar in that they are vibrant and sharp. What I would do differently on this day would be taking some BTS shots to show that I'm the one who's taking the pictures. The strengths of mine during this project would be taking the pictures and using the camera as this is already my strong suit since I would like a career using cameras and different camera kit. Another strength would be editing the images although it wasn't hard, I kept consistent throughout editing them. A weakness would probably be my patience as some people ended with around 500 pictures and I only had half of that, so I would improve the quantity of my work. This would also tie into the opportunities I missed as I would have a lot more work to show. There wasn't any threats when taking photos, it was a clear day and overall a fun experience. I guess the time schedule for the event was a bit scuffed as they planned times that they didn't stick to, also the sun was quite bright at some parts which made the photos at this time over exposed. Overall though, it was a great day for photography and it went well.