
Vlog Production


Cost: £469.99 from Amazon
Product Explanation: The Canon 700D was first Manufactured in 2013 and is a great Vlogging camera as it performs well in difficult conditions. Compared to more recent cameras like the 7D, the 700D has a longer recording time as it films in less quality although the quality is still good. You are also able to adjust the view screen so that it is facing you and you can see how well the shot is composed.
Cost: £34.97 from Amazon
Product Explanation (Tripod): In Vlog production, a Tripod is alright to use if you are planning on standing still whilst talking to the camera. Using a tripod is also good for getting steady footage for the vlog as at this point you won't be talking to the camera. There are different adjustments you can do ton a tripod, for example you can extend the legs so that it goes higher or lower, or you can extend the pole in the middle.
Product Explanation (Monopod): A monopod is a single leg of a tripod that you can unscrew so that you have a selfie stick for more mobility and practicality for vlog production. The monopod of a tripod usually has a soft padded section on the leg so that it is comfortable in the hand. As the monopod is a tripod leg, it is extendable to the length that suits the user.
Cost: £55.90 from Professional Music Technology
Product Explanation: This lightweight Rode mic doesn't need any batteries and is as simple to assemble as just screwing it onto the top of the camera, opening the rubber flap on the side of the camera that has a 3.5mm mini-jack input and just plugging it in. What this mic will do is increase the quality of the audio as it picks up surround sound, unlike a shotgun mic.
Cost: £239 from Professional Music Technology
Product Explanation: This Shotgun Microphone is better than the other Rode mic in that the quality it will pick up audio is better as this mic is more directional. This means that anything in front of the mic will be picked up in good quality, however if the subject is to the side of the mic it won't pick up the audio as good. Also, this mic won't plug into a 700D as it uses a XLR cable and will only plug into a TASCAM or a camera with XLR input. One problem with a shotgun mic is that if there are multiple people speaking around it, it will struggle to pick up everyones audio.
Cost: £39.99 from Amazon
Product Explanation: This is a Lapel Mic and compared to the other mics, a lapel mic will be more used in interviews or for shoots that require audio and movement. In some cases this mic is more useful as you can attach it to who you want and they can keep a small TASCAM in their pocket. Something wrong with this however is the TASCAM might fall out their pocket and detach from the lapel mic and you'll lose some audio.
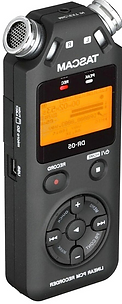
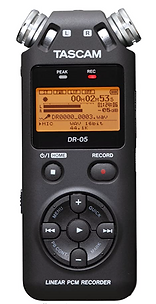
Cost: £56.99 from Amazon
Product Explanation: This small, lightweight TASCAM works really well with a Lapel mic as it plugs into the side of the TASCAM and can be put in your pocket. However, as previously stated, the TASCAM could fall out of your pocket and detach from the mic and you'll loose some audio. Not regarding the Lapel mic, a problem with the TASCAM DR-05 is that if you want higher quality audio from a shotgun mic per say, it doesn't have a XLR input so the best audio you could record from it is from the camera mic.
Cost: £89.94 from Amazon
Product Explanation: This is a soft box light which consists of a high watt light bulb and a sheet of white material that creates a natural light feel. The problem with this exact light is that it is quite big and requires a duffel bag to carry around. However if you are on shoot with this light you won't have a problem with it being too dark as it can shine up to 700W.
Cost: £99 from Amazon
Product Explanation: This is a DJI Osmo Mobile 3 which is a hand held phone stabiliser. Something great about this product is that it is travel suited and good for holidays. A problem with this is that it isn't suitable for high production shoots as it doesn't film in the best quality, however it is great for hard to get to shoots, like in the woods or some place secluded.
Cost: £69.99 buy used from Amazon
Product Explanation: This is an 18-55mm camera lens or kit lens, which is the most basic camera lens you can get. The lens is like a human eye as the zoom isn't very far and is used more for landscape and general photography. This lens is situational in that it is great for landscape walks and family trips, however when it comes to highly technical production shoots you are going to need a lens like 55-200mm and a good quality camera that can film in 1080p as the recording time doesn't matter as much.
Cost: £16.99 from Amazon
Product Explanation: This is a RØDE Deadcat Furry Windshield mic cover which is used for when it is windy and you are trying to pick up what someone is saying. These are mostly used in the news media industry as they have to go out and make reports no matter the weather. If they were to use this when it is not windy, it would reduce the chance of background sound being picked up and plosive sounds. If you were to use a mic without a foam cover or deadcat on it, the mic would pick up all the surround sounds like birds, cars, wind and even the noises the interviewee's mouth makes. So without a mic cover, the mic is very sensitive to sound.
Cost: £5.38 from Amazon
Product Explanation: This is an XLR cable, which is used for plugging a Shotgun mic into a TASCAM / plugs a mic into an audio recorder. The problem with an XLR cable is the same problem with a Shotgun mic, which is that a Shotgun mic is directional with picking up audio and this could be a problem if the subject you are recording isn't in front of you.
This Cycling GK vlog received 733K views in 3 weeks, it is 11 minutes long and is filmed entirely on a GoPro. Ben Foster has 911K subscribers on his YouTube channel and makes videos on his everyday life whether it be match day BTS or day off cycling advice. The reason Ben Foster has had a serge in popularity on his Youtube channel is because of his likability and genuine personality, he also timed it well with Covid-19 as people wanted more football content since they couldn't attend a game for theirselves. The constant zoom in transitions do get quite repetitive though.
60 Second Vlog Chalenge


This is my Premiere Pro editing timeline for the 60 second vlog challenge. For the vlog, we needed a variety of different shot types, like close ups, focus pulls, drone shots and there are different editing techniques like frame block transitioning.
This is the final vlog, which is a highly edited montage of the best footage we gathered on the day. I recorded different shots like focus pull shots, close ups, wide establishing shots, action shots, etc. I also used some editing techniques like frame block transitioning, dip to black and audio gain to help make the vlog flow smoothly.
1.2 Pre-Production
SHOT LIST: Looking at my shot list, I can see that it isn't very clear of what is episode 1 and what is episode 2. This is the same for the VOICE OVER SCRIPT and A/V SCRIPT. To help make it clearer, all the footage was collected in one night. For the shot list, everything is for episode 1 beside the parts where the GoPro is filming me recording the game and the kit assembly VoiceOver part. If you take this clarification to the other two documents, it will be much clearer as the A/V SCRIPT is just a guide for what I need to film and in what order (the 6 minutes on the time stamp was an episode estimate which isn't accurate anymore) and the VoiceOver script is for both episodes besides the paragraph of me explaining what kit I am using.
Raw Footage
This is some of the footage I gathered on the BCFC vs Stoke match day, the first video is a time-lapse of the stadium filling up with fans and the second video is the end of the first half, where BCFC score to take a 1-0 lead over Stoke. All the footage I gathered on the day I am happy with apart from some of the game footage as the tripod was holding the camera on an angle and the lens I chose didn't suit the filming very well.
This is some more raw footage/audio for the vlog episodes. On the left is a talking heads shot of Downsy (Ian Downs) giving his score prediction for the game and I filmed this with the GoPro. Below is the raw music files I used for the vlogs, I found these on the YouTube audio library for free.
Premiere Timeline Annotations

This is a caption layer, which is used to write captions on the screen. I used these as well as voice overs for both episodes.
This is the GoPro footage of me operating my camera during the game. I've had to reduce the audio gain for these clips as the crowd was deafening.
This is the background music I used for the second vlog, however I found both of the music tracks on YouTube's audio library which is copyright free.,
I have used default transitions to help structure the vlog so that it transitions smoothly from section to section.
This is the magnet tool (timeline snap) which snaps your clips into place when selected (blue). In this screen shot, it isn't selected so this means that I can move clip by small amounts to help with syncing audio and music. This helped with the start.

This part of the timeline is cut up a lot so that it cuts with the beat of the music. All I did was cut up a piece of b-roll into multiple split second clips, mix them up a bit and sort out any out of time clips after.
Final Vlog Episodes
These are the two finished vlog episodes for CDM 305. The first episode is a more match based experience from a camera operators perspective, the second episode is more behind the scenes based so I can show the kit I used to record the game. The first episode is around 12 minutes long, whilst the second is around 4 minutes as there isn't actually much BTS to show from a pitch side camera operators perspective.
1.3 Content Strategies
Here are my targets I would like to hit for my two match day vlogs. I will be posting the vlogs to YouTube and promote them on LinkedIn and Instagram. On YouTube, I would like to reach 50 views for the vlogs and would like to gain some subscribers by promoting the vlogs on other social medias and also getting people I know (like family and friends) to interact with the vlogs.
1.4 Evaluating the Success


Here is proof of me promoting my vlogs on Instagram and LinkedIn. Evaluating the success of doing this, I can see that posting the videos on LinkedIn didn't really help spread awareness of my vlogs. It is interesting to look at the views compared to YouTube as the BTS vlog received more interaction and impressions (within the first 60 days) compared to the main vlog and here you can see the main vlog received more interaction.
Vlog Episode 1

Vlog Episode 2

Here you can see the comparison between the views across 126 days of them being out. Episode 1 has a higher watch time as it is a longer video at 11 minutes and episode 2 is 4 minutes. However, episode 2 received more views earlier on in its release and got to 30 views within 64 days and episode got 30 views after 90 days.


Here is the audience retention for each vlog episode and you can see that episode 1 (although it is longer) received a longer view duration by a minute compared to the shorter video. This shows that people are more interested in the match than the behind the scenes that goes into making the vlog. I used the same Hashtags for both vlogs as well so that the reach, depending on what the viewer searches, is the same. Finally, you can see that episode 1 is more engaging by looking at the percentage of people that are still watching by the end of each episode. Episode 1 has double the viewers than episode 2 by the end of the video.
Episode 1

Here you can see the reach of both episodes over the course of 126 days from release. Looking at both of these graphs, I can see slight differences but overall they are very similar in reach. Episode 1 received 247 impressions from promoting them on social media and getting boom satsuma to also promote them. 8.9% click through rate.
Episode 2

This is episode 2 which received less reach than episode 1 but got a slightly higher click through rate and less views. Overall, both episodes' graphs are similar and received boosts at the same time. I guess the difference maker in this is the thumb nail I used on episode 1 which is a lot more engaging than episode 2 as I didn't make a thumbnail for the BTS.
Episode 1

This is the viewer interaction I received from episode 1 of the vlogs which was some positive feedback overall. One problem noticed by a viewer was the camera ticking was shaky as the tripod I used was shoddy and shaking the whole game. Besides this, the overall feedback was positive.
Episode 2

This is episode 2 which shows the kit side of match day filming and BTS. I received positive feedback for this episode and no negative which shows the episode was clear and understandable.
Overall, both episodes received positive reinforcement and were enjoyed by the viewers